I love PowerWebform – the add-on that easily creates webforms able to send data directly into Dynamics CRM (I still wonder why the feature is not a standard one UPDATED 2017: you can use VOC now, but I still prefer PowerWebform).
But creating a case was tricky
Recently I wanted the add-on to create a Case in CRM … but I struggled with why PowerWebform was not able to generate it as it normally was able to with all other entities.
The reason: you have to fill out “Customer” field on the case. And since it was a lookup you need to know the lookup trick which PowerObjects themselves describes in their user guide (find section Field Types and read about the hidden field):
- Create a dummy contact in CRM (I.e. “Customer NOT checked yet” and find its 36 character GUID
- Create a HIDDEN text field labelled the entity name (contact) in my case).
- Fill in the default value with the GUID of the dummy contact
Then you should be able to auto create cases in CRM.
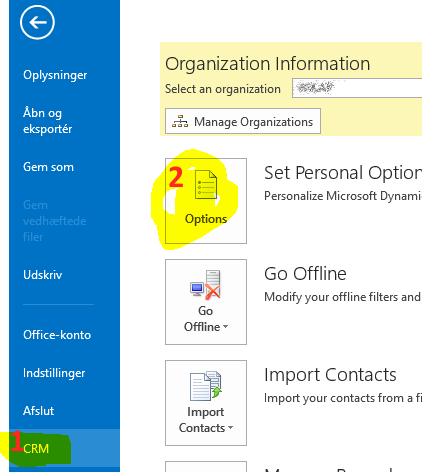
Dynamics CRM for Outlook Plugin has a nice feature not used (or known) by many: You can easily send mails to CRM Leads or Contacts (or other e-mail enabled entities). Here is how:
Step 1: Make Outlook look into CRM contacts:
Open Outlook with CRM plugin already installed and configured. Head for File Menu and CRM and Options:
When option screen appears you should head for the Address Book tab
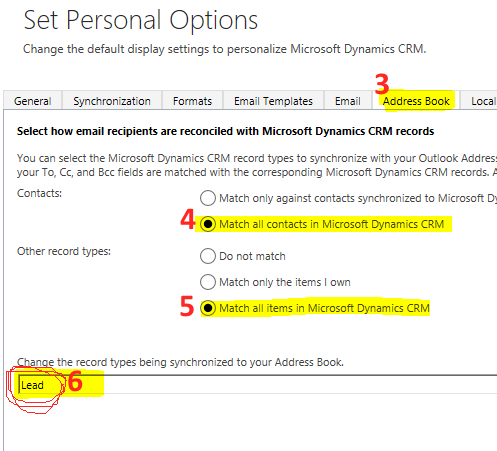
(in step 6 you specify which other entities you would like to select – including e-mail enabled custom entities).
Click OK to save your Personal Options
Step 2: Start using it!
Create a new e-mail in Outlook and click To in order to select CRM Contacts or Leads. In the Addressbook (adressekartotek in Danish) drop down you find the relevant CRM Entity to search for. You can also search from the search field when selected (but use first name).
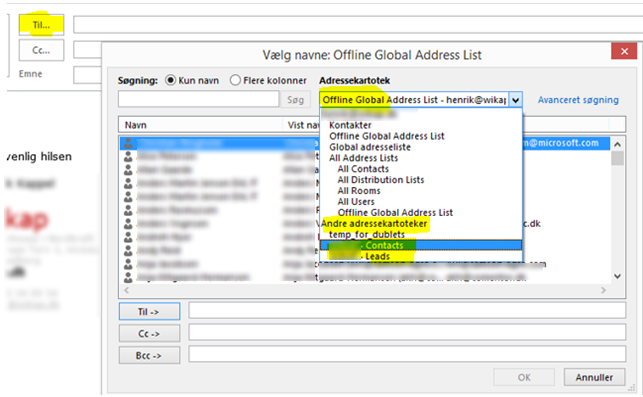
That’s it!
/Henrik
After Polaris, I have four customer solutions where I can’t create new or copy existing system views. When I do, I get the following error message:
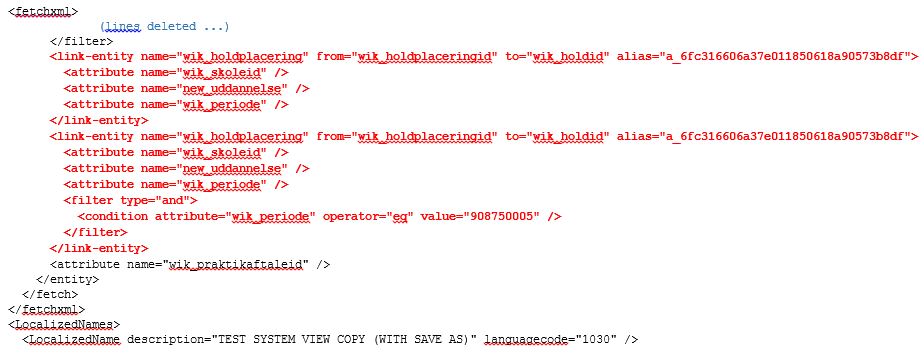
<Message>System.Xml.XmlException: Microsoft Dynamics CRM has experienced an error. Reference number for administrators or support: #FF39F24C</Message> <Message>Table alias a_6fc316606a37e011850618a90573b8df is not unique amongst all top-level table and join aliases</Message>Of course, the GUID can differ in your error case. In my case the problem was related to a Custom Entity.
In addition, you will notice strange looking related entity lines if you look at the Filter definition of the copied view:
I ran a Microsoft support case, but at that time they couldn’t find a solution, and told me that it will be fixed in RU14. But now half a year later it is still a problem to my four customers’ Online organizations.
Problem
Researching the XML view definition you will easily notice the error – the link-entity is created as a duplicate with the duplicated GUID:
Solution 1 – just modify the view definition itself
One solution, which I have relied on until now, was to create the new system view or copy an old one; then export the XML definition in a simple solution (containing only this single entity) and finally manually stripping away the duplicated “link-entity” section in the XML. This worked fine, but was hard work since I used a lot of system views which need to be recreated semiannually. Other people have also already found this a feasible work around, i.e.:
- Imagine Technology Group: http://thinketg.com/crm-2011-error-resolution-table-alias-a_dc9b80f8c78146d89fd6a3b610836975-is-not-unique-amongst-all-top-level-table-and-join-aliases/
- SalesMetrix: http://blog.salesmetrix.com/2013/02/08/corruption-of-views-dynamics-crm-2011-online-dec-2012-service-release/
- Feridun: http://fkbase.info/node/161
Help from other resources
Today I needed to copy the views semiannually and during that process I researched and found that now other people are facing similar errors. Thanks to this I think I now have a solution that can solve the error permanently! So thanks to these guys here for pointing me in the right direction:
- Thanks to Bob Hatcher for revealing that new system views (and copies) are related to the Advanced Find XML definition (http://social.msdn.microsoft.com/Forums/en-US/e17c9a53-6fe2-435f-a1ec-058899ffb1ef/issues-with-advanced-find-dynamic-lists-since-polarisr12 )
- Thanks to Mayank Agrawal for pointing to the Advanced Find view definition – I assume his solution is the similar the the one I show below http://social.microsoft.com/Forums/en-US/913413a5-de99-44d2-88a8-80c36e620275/issues-with-quick-find-and-crm-2011-rollup-12
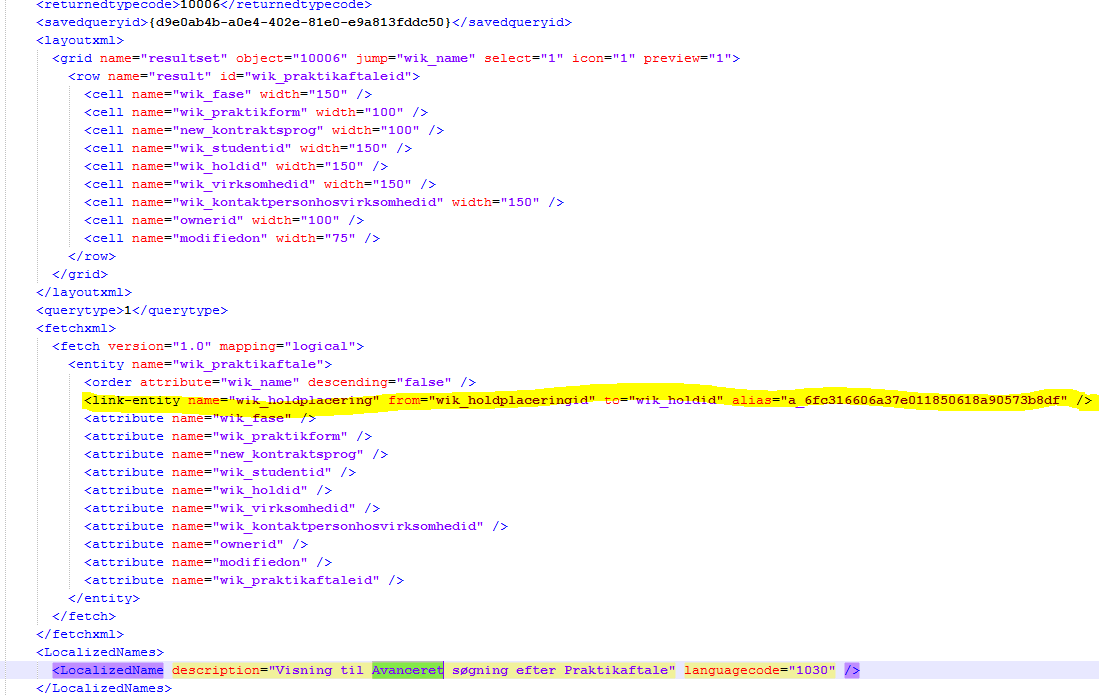
Solution 2 – clean up Advanced View Definition
Here is a walk through of a solution that seems to have fixed the issue permanently for me. Overall its about cleaning up the Advanced Find XML definition since this seems to be the main problem. You need to repeat the process for each entity containing the problem.
- Open the entity’s System View definitions
- Open the “Advanced Find” view definition
- Clean up the Advanced Find view column to ONLY contain columns from the Entity itself (NO columns from related entities must be contained as view columns)
- Publish Entity
- Create simple “Temp” solution and add the Entity above (and only this Entity)
- Export Temp solution
- Backup the Zip file (just in case you need to go back)
- From the Zip file, extract “customizations.xml”
- Open customizations.xml in text editor
- Locate the “Advanced Find” view definition:
- Strip out the link-entity line(s), since there are no references to related entities anymore (they were cleaned out in step 3, but CRM does not clean up the fetchxml)
- Save the XML file
- Re-insert it into the Zip solution file (remember to keep the copied one as a backup)
- Re-import the solution into your Organization and publish the entity
Now you should be able to create new System Views or copy existing ones (even copy ones with View columns from related entities).
In my case I only had one link-entity line – and my problem was related to a Custom Entity I created. Hopefully this solution method is generic to other entities as well.
Comments are appreciated in case you find other solutions.
Her er en interessant analyse omkring sikkerheden i Cloudløsninger.
Klik her for at læse artikel …
Konklusionen er at der ikke på artiklens tidspunkt er konstateret nogle sikkerhedsbrud på Cloudløsninger.
Microsoft stiller naturligvis også selv en del informationer til rådighed omkring sikkerheden på CRM Online (og Office 365):
Klik her for at læse artikel …
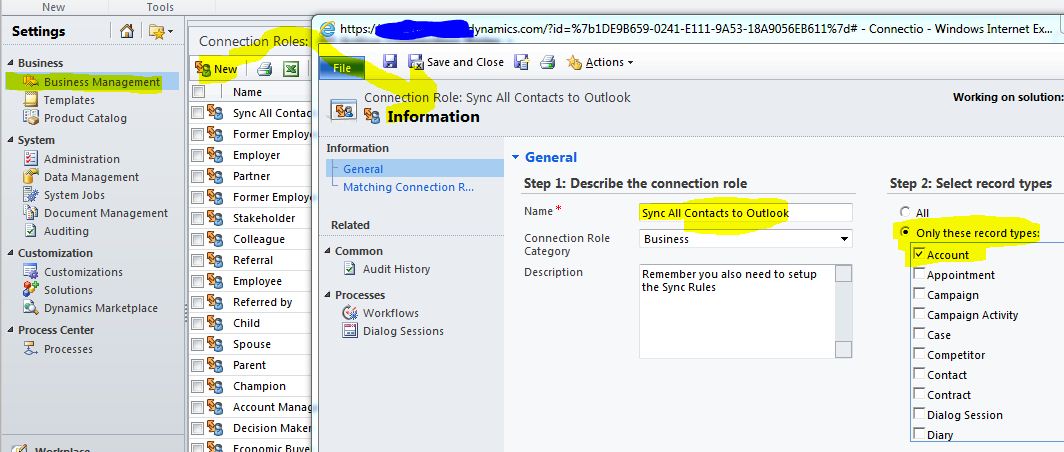
Et ønske, jeg ofte støder på hos mine kunder, er at have muligheden for at abonnere på andre folks kontaktpersoner (som standard synkroniseres nemlig kun de kontaktpersoner man selv står som ejer på).
Efter min mening er dette den nemmeste måde at lave dette på (du kan herefter abonnere på en enkelt kontaktperson, eller et helt firmas kontaktpersoner):
- Oprette en Connection Rule “Sync All Contacts to Outlook” (skal gøres centralt af administrator)

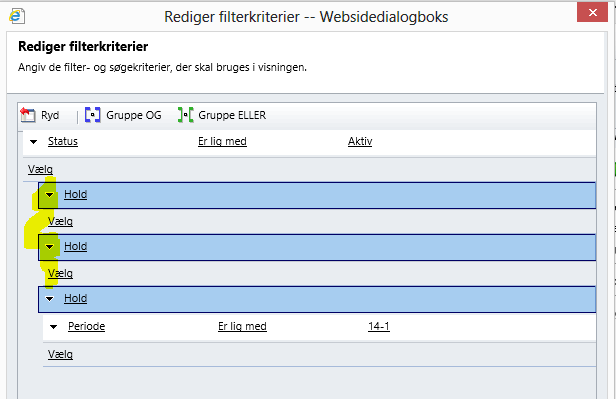
- Oprette 2 stk Outlook Filters (kan gøres af brugere på de enkelte maskiner):

- FILTER 1 (My connections):
- FILTER 2: Sync all contacts from a given account:


Når du er færdig med dette har du sat Outlook/CRM rigtigt op – nu skal du blot “Connect / to me” med de kontaktpersoner du ønsker at abonnere på:
- Abonnere på en enkelt kontaktperson:
-
- Abonner på en hel virksomheds kontaktpersoner:
-

